


The Kayfun 4 is a very nice atomizer, complex but powerful which I do not get tired.

A priori, it could be scary with all these pieces but it is not so when we have taken the time to discover it. However, it is essential to know a minimum of the operation of compression atomizers and to disassemble the Kayfun 4 in its entirety to be able to identify the potential problems that may arise.
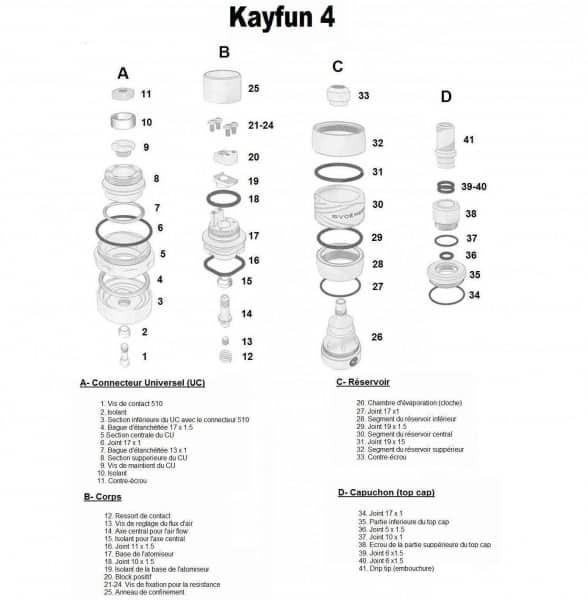
We can already identify the three main parts:
- The connector (A)

- The body of the atomizer (B)

- the tank (C) with the top cap (D)

This atomizer has the particularity of being able to decrease or increase the flow of liquid from the connector by means of a ring (5) called “central section”, which by turning anti-clockwise, makes refit the plate (8) or “upper section” in connector A.
Going up, this plate comes to be pressed against the internal part of the bell (20) (evaporation chamber), thus less and less liquid flows until the arrival of the juice is completely closed.
Knowing that the airflow remains open and totally independent of this “mechanism”.

After three months of intensive use, I encountered a few drawbacks that I will try to identify.
The very first was at the base.
The rickety base:
In order to reduce this effect, it is enough simply to tighten the screw (9) which keeps linked the three sections, lower (3), central (5) and upper (8). Be careful not to tighten too hard because the central section must be able to turn freely but without this play which makes the whole shaky (at the level of the ring). So do moderate tightening.


The air flow adjustment:
I find it a bit restrictive at first, but once this setting is found, there is no need to touch it.
To do this, simply mount your atomizer, remove your contact screw (1), taking care not to lose the insulation (2).
Then with a small flat screwdriver you access the air adjustment screw (13) which is located in the central air flow part (14).
When you screw / unscrew this screw, it is positioned so as to more or less block the holes of the central airflow piece, which are located in the hexagonal part of it. Then, you suck in the atomizer to check the accuracy of your aspiration in relation to your desire. Once you have found your air rendering, all you have to do is screw the part (1) (contact screw 510) back with the insulation.

The contact spring:
This spring tends to clog quite easily and causes loss of contact. By manipulating the ring (5) a little, cleaning or stretching this spring, the contact returns.
In addition, with some boxes, the material of the spring proves unsuitable (instability of assembly values or lack of contact, etc.). If you notice such a problem, it will be necessary to change it by replacing it with a gold-plated spring sold separately.

For filling the tank:
From inside the bell:
In order to unscrew your bell (26) with its reservoir, the plate (17) (base of the atomizer) must be perfectly flat against the upper section of the connector (8) (therefore the ring (5) is screwed to that time). In this configuration, the liquid will flow, which is why you have to place the atomizer upside down to unscrew it. Then just turn the base of your bell counterclockwise.
The “little game” of screwing / unscrewing at this level is not always obvious the first few times, but by inserting a small screwdriver into the airflow hole in the central part, you will have a fairly easy grip, without forcing and without having to use a latex glove.
Once the tank is filled from the inside of the bell, you replace it. Still upside down, turn off the e-liquid before turning your atomizer upside down by unscrewing the ring (5) until you feel the “stop”. The arrival of the liquid being closed, you can put the atomizer back, wait for everything to stabilize (2 seconds) and finally open the arrival of the juice by screwing the ring. We see the bubbles go up in the tank and no leak appears. After a few aspirations, the priming is done.


By the top cap:
First of all, you cut off the arrival of the e-liquid by unscrewing the ring (5). Then, you open the top cap, you fill, then close the atomizer and finally you can open the arrival of the juice by screwing the ring back (clockwise).

E-liquid leak:
This happens when the process for filling is not followed.
I have also had leaks following many manipulations of the sections of the universal connector. My airflow adjustment screw (13) slipped gently from the center piece (14). By protruding, this prevented the base (17) located in the body of the atomizer, from completely resting on the upper section (8) of the connector. Which caused leaks.

Subohm:
This atomizer is designed to work with low resistance values (below 1 ohm) but for this you will need to buy a suitable kit (not included with the atomizer), because the base insulation of the atomizer does not support not very very low values (and therefore the resulting heating) and has a tendency to deform (see melt). I paid the price:

I bought the subohm kit and to my surprise, the central air flow piece (14) looks identical to the one supplied with the atomizer. Well no ! Since I could not insert the adjusting screw inside because there was no thread inside. On the other hand, the insulation seems more robust than the preceding one.

Here too, as for the spring, a pity that this insulator is not supplied with the atomizer as standard because these are not really options but a necessity to be able to operate normally in subohm (which is originally planned) and on any type of mod.
Let's move on to assemblies:
A single Kanthal 0.3 resistor, on a support of diameter 3mm, with eight turns for a total of 1.6 Ω

Double resistance in Kanthal 0.3, on a support of 1.8mm of diameter, with seven turns each for a total of 0.6 Ω

Remember to raise the resistors to avoid risking the short circuit because the space on the board is really small.
Also remember to cut the excess kanthal so that it does not protrude from the screws and that it does not touch the edges of the retaining ring.


